Pages

Friday, May 31, 2013

DIY Wooden Child Picnic Table Instructions

My husband made this adorable child size picnic table last summer for our boys...and as usual...I never got around to posting it in the right season. With Summer here, we are enjoying quite a few picnics outside again. I truly think my boys eat better when we are outside. There is just no fuss about sitting down for lunch in the backyard.
 
We are still packing like crazy around our house so I am exhausted. My crafting skills have been confined to making cardboard boxes lately!


The only major problem with posting a project like this a year later...is that I didn't write down all the directions. Hopefully, I took enough pictures that the explanation will be somewhat self explanatory.

 
I am thinking we started with eight 2x4's.

 
We started by cutting:
*Five 42" 2"x4" for picnic table top
*Two 16" pieces of 2"x4" to mount under picnic table top
*Four 42" 2"x4" with angled edges for picnic table seats
* Four 26" 2"x4" for picnic table legs
* Two 42" boards to support seats

 
The supports for the picnic table top were placed 5 1/2" from the ends of the table.


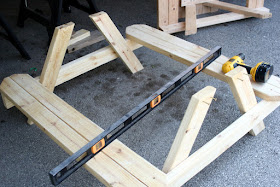
This is how my husband assembled it pictured above. Their might be an easier way...but we are by no means carpenters! We did pull out the level though.

 
We loved ours so much that we ended up making some more child size picnic tables as presents. Depending on the price of wood in your area, this project should cost you $25-$35.


Last...but not least...we stained the table. This project only took a few hours to make, and it was well worth the effort. The boys love it and it is the perfect size!
 

Monday, May 20, 2013

We are Tickled Pink...We are having a Girl!!

This is a Sponsored post written by me on behalf of Comfort and Harmony for SocialSpark. All opinions are 100% mine.
  We are expecting our 3rd child in early September. We already have two boys, so we were literally tickled pink when we discovered this baby is a girl! I can finally make all of those fun blog projects that involve ruffles, pink, and infinite girliness. I was especially excited when I received an offer to try out a new nursing pillow by Comfort & Harmony called the Mombo.
I am 6 months pregnant and I am gaining quite the belly. I was relieved when the Mombo easily fit around my waist or lack of waist comfortably. One side of the mombo nursing pillow is firm and the other side is softer. This allows dual functionality for nursing or using the pillow for tummy time. Perfect! I am definitly packing this pillow for the hospital.
Did I mention all the attractive covers available for the Mombo? There are bright colors, neutrals, taggie covers, and more. They are available in store and online at BabiesRUs. Since I am not ready for this pillow yet, I brought it over to my friend's house to try it out.


Her little girl loved the Mombo. She was giggling and rubbing her face on the soft cover within minutes.


 I would imagine she would love it just as much for nursing. I can't wait to try it out myself when my little one arrives.


Comfort & Harmony mombo in Taggies Deluxe Pillow & Infant Positioner - Comfort & Harmony  - Babies"R"Us    
Visit Sponsor's Site

Thursday, May 16, 2013

Baseball Team Favor Sacks for Game & Party Time

My son started t-ball for the first time now that he is 5. We had to sign up to bring snacks for the team twice during our short season. I can't miss an opportunity to make something a little creative to pass out the baseball favors or snacks. I know I have mentioned how to print on brown paper sacks before. The hardest part, is just figuring out how to load them in your printer properly, so that they print facing the right direction. I also tape the back flap and seal the top with a small piece of tape so they don't get stuck in my printer.
 
 
Supplies:
Brown paper sacks
Printer
Ribbon (or tie)
 
Directions:
 
If you want a good tutorial for printing sacks check out Cottage Hills blog post here.

 
Here is my little Red Sox. I think he enjoys dressing up in his uniform more then he does going to play the game. Maybe the love of the game...will come with time.
 
 
I barely lasted through the game to hand out sacks at the end. My three year old was not feeling well, and he threw up all over me and himself with ten minutes of the game left. There is never a dull moment. Lol! We washed up quickly and made it back in time to hand out treat bags. 
 
 
The baseball team favor bags were a homerun! I will definitely do these again next year. I filled them with red candied popcorn and some other treats.


Wednesday, May 8, 2013

Nurses Week or Teacher Appreciation Gift

This week is not only Teacher Appreciation Week...it is also Nurses Appreciation week. This gift, with a little modification, would work for either. For a teacher...You could easily put your a life saver! This simple DIY project is so fast to make. The vintage look really appeals to me, so I found an antique looking nurse graphic for these jars.
 
 
I filled the jars with a brightly colored loofah and some homemade goat milk soap. Tied with a little rafia and a sweet tag, the present was complete. The gift itself is so simple...but I think it is all about the presentation!  And besides, who doesn't love to be appreciated.