Pages

Thursday, January 31, 2013

Avocados from Mexico and Cafe Press

This is a Sponsored post written by me on behalf of Avocados from Mexico for SocialSpark. All opinions are 100% mine.

I know many of you love Avocados from Mexico just as much as I do! I incorporate them in our meals all the time. They are delicious on salads, tacos, substituted as a baking ingredient, and of course in guacamole. If you missed one of my posts a few months ago, I made some incredible chicken stuffed avocados that I baked in the oven. Click here for the recipe. Yummy goodness!! I also love them in this salad recipe.

AFM_Logo_stack_NoTag_zps2eae3188-1_zpsaf020678-1_zps928fee63

The minute I received another offer to write about avocados, it was a no brainer. I received a gift card to the Avocados from Mexico Cafe Press store. I picked a fashionable brown bag with I Love Avocados on it. Ooooh, I can't wait to receive it on my front porch. It will be perfect to take to the grocery store to shop.

I Love Avocados Tote Bag - Cool Design

Want to join me with your love for avocados? Participate in the #Iloveavocados Twitter party on February 7th between 3:00 and 4:00 PM EST. $500 in gifts and prizes will be given away. Also, check out the Share the Avocado Love Facebook app. You can download ring tones, screen savers, virtual gifts and more. I just sent my mom a virtual guacamole...I hope she likes it!

Visit Sponsor's Site

Monday, January 28, 2013

Dr. Seuss Cat in the Hat Birthday Party

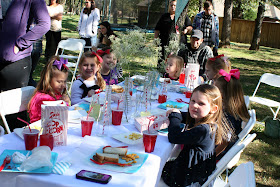
Oooh...I went to one of the cutest Dr. Seuss Cat in the Hat Birthday Parties ever! The invitation itself was out of this world. I will share it last. Just look at this cake! Incredible! My friend Melissa didn't forget a thing while planning her little girl's 4th birthday and her son's first birthday party. It was a perfect theme to invite boy and girls too, and the party was done in her back yard. I am embarassed to admit I didn't remember all the details in the book, so I had to read it to appreciate all of the clever decorations and unique designs around the yard.


Melissa even went to great lengths to paint old furniture white to display the party refreshments and cake on. It was amazing how that topsy turvy cake stayed upright.


I loved the contrast of the bright red and yellow juices and the simple white desk.


The Cat in the Hat was front and center of course. He had goldfish and sandwiches for the little ones.


This table had more sweet treats...cake pops with cotton candy on top, stuffed strawberries, and whoopie pies.


As we entered, each little boy and girl received a red polka dot bow.


The girls used the bobby pins to put it in the hair and the boys adorned their precious little bow ties.


This is my son in his bow tie. Hysterical! First time I have ever convinced him to wear one!


There were clotheslines across the yard with small pieces of red, white, and blue fabric strips tied on them.


Propped up against a tree was the window and rake from the Cat in the Hat story.


Melissa made kites to attach to the trees for decor as well. She used two dowel rods in a t-shape and then just taped the fabric around them to form the kites. I loved this quick no sew solution.

After a while, the kids grabbed their plates and milk glass drink holders to eat all the sweet treats.


The tables had simple glass vases with babies breath. Just the perfect touch.


The guests enjoyed every moment.


Even my husband and little one had a good time.


And those cotton candy topped cake pops were not only adorable but delicious when they hit your lips!!


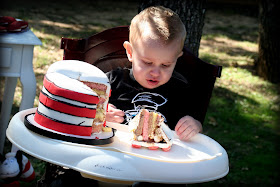
This is the birthday boy!


The birthday girl in her perfectly themed precious Dr. Seuss dress.


It sure felt like the cake would fall any minute from this picture, but it was as stable as can be.


A separate little hat cake served as the one year old's smash cake. (Not sure what to think yet)


Thanks for a great party Melissa! You definitely have me beat in the party planning department!!

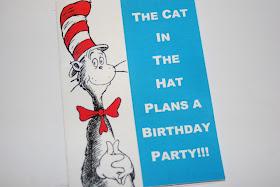
And last but not least as I promised the Dr. Seuss Cat in the Hat party invitation...


Is that not the cutest, most unique and clever Cat in the Hat birthday invitation you have ever seen??


Sunday, January 20, 2013

Hanging Valentine Post Office

A while back, I saw a cute door hanging puppet theater that inspired this Valentine themed post office for mail delivery. My boys love mail, so Valentines are especially fun. Letter writing seems to be an increasingly lost art these days, but who doesn't love receiving something in the mail besides bills! I know I do.

My kids have quite an imagination of their own, but I always think it helps to play with them and encourage new ideas. I also made some small felt letters to play mail delivery with. They are the perfect size to insert store bought valentines or homemade ones.


I started off by cutting a piece of red velvet fabric to fit the doorway. I then sewed all the edges under. You could easily use press in tape if you don't choose to sew.


Next, I cut out the letters for mail and two hearts and used a zig zag stitch to secure them. (Again, you could use press on adhesive if you don't sew)


I cut the window opening 19" x 9" and then a small mail slot approx 1" x 8". If I were to make another hanging post office, I would probably cut the window much smaller. (Possibly 9x9). I then used red, pink, and white ribbon to trim out the window and mail slot.


I sewed up some sweet felt envelopes for our Valentine letters. Only one day left!!


Got Mail?

Sunday, January 13, 2013

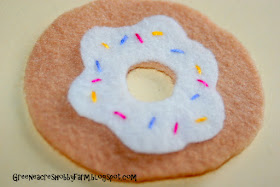
Felt Donut "Recipe"

What is better on a Sunday morning then some delicious donuts? Yum. My boys love playing kitchen just as much as most little girls I expect. They love cooking me up a quick breakfast or a nice hearty stew. We didn't have many options in our plastic breakfast food so I made them some felt donuts for Christmas. I was suprised that making felt food can be a bit time consuming. However, they have already spent hours playing with it, so it was worth every second.

 
I chose to make small donuts, about 3 1/2" each. I have seen many donuts on etsy that are the size you would generally buy at a donut shop. With storage always as an issue at our house, I decided small donuts would be the best.
 
Supplies:
Brown and tan felt
White felt
Scissors
Embroidery thread
Polyfill stuffing
 
Directions:
 
1. I started out by cutting out two tan circles about 3 1/2" each. I cut a small hole in the middle of both.
 
2. Next, I created my icing out of some white felt. I used small embroidery stitches of different colors to make the "sprinkles."


I chose blue, yellow and pink sprinkles for my yummy donuts.

 
3. Facing right sides together, I sewed around the outer edge only of the circles. (Don't sew the middle circle. I made this mistake the first time not thinking!)

 
4. Turn your donut inside out and add some stuffing. ( Just keep shoving it into the donut until you don't have any more stuffing showing in the center hole.)

 
5. The last step is to hand stitch the inner circle to sew the donut up.
 
 
I found this cute display box at Michael's for all of the cookies and tea bags. If you missed the felt Halloween sugar cookies look for instructions here. The teabags will be coming soon. I have a lot of posts to catch up!


Tuesday, January 8, 2013

Chicken Enchiladas

I know I have been such a slacker lately and I have not posted in a week. I am still trying to clean up my house from Christmas. We are also considering selling our home so I have been organizing and purging to the max. However, that has not stopped me from making these easy and scrumptious chicken enchiladas.
 
I got this delicious and simple chicken enchilada recipe from my mother-in-law and I make it all the time. The problem is I keep forgetting to take a picture of the end product. They smell so delicious, I always just head straight to the table with these chicken enchiladas, forgetting to take a picture. I used the photo below from bettycrocker.com because it looks very similar.

Cheesy Chicken Enchiladas
 
Ingredients:
 
Green chiles
Onion (white)
1 can cream of chicken soup
1 can Campbell's Nacho Cheese
Sour cream
Cooked Shredded chicken
Taco seasoning
Flour tortillas
Shredded cheese
Green onion optional
 
Directions:
 
1. Preheat oven to 350 degrees. Saute 1/2 chopped onion and green chiles until onions are translucent.

 
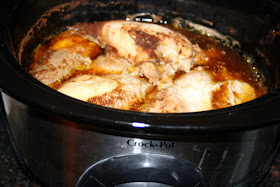
(I like to cook my chicken in a crock pot with taco seasonings, 1/2 can beer, and 1 can water)

 
2. In a bowl, combine shredded chicken with green chiles, onions, and approx 1/2 packet of taco seasoning. Mix well.

 
3. In a separate bowl, mix one can of cream of chicken, one can of Campbell's Nacho cheese (may be labeled soup), and about 8 oz of sour cream.
 
4. Fill chicken mixture in tortillas and lay seam side down in greased dish.


5. Cover tortillas with sour cream mix generously.

 
6. Cook uncovered at 350 degrees for about 30-40 min. Top with shredded cheese and cook a few more minutes until the cheese melts. Optional: Top with sliced green onion.
 
Cheesy Chicken Enchiladas
photo from bettycrocker.com
 
7. Enjoy!
 

Tuesday, January 1, 2013

Transform Christmas Cards to Phone Contacts

I have been busy a good part of the day putting up the majority of my Christmas decorations. My house always looks a little lonely with all the lights, trees, and greenery packaged up. I also took down my Christmas cards and put them in a pile to save. With the surge in popularity of photo cards, I love looking at all my friends and their family that we received. I know everyone put so much effort into getting their photographs done in time to squeak those Christmas cards out.

So why waste a good photo? Capture it for the next year, or however long you please. I set my cards on the table and starting taking pictures of them with my phone one by one. I was able to assign them to their appropriate contact, so I can enjoy them each time someone calls.
 

I do have to say the pictures on my phone look much better then my attempted photographs.

It was very challenging to take a picture of myself taking pictures. Ha!
 
 
Well, this project took just minutes and it is a great way to treasure my dear friends and their children.

 
I hope you all had a fabulous holiday and a safe and fun New Year's Eve celebration!
 
P.S. The winner of the Williams Sonoma $50 gift card and free pie certificate was Valerie. Thanks for all those that participated!