Saturday, July 28, 2012

Snickerdoodle Cookies (*6 ingredients)

I was in the mood to bake today. I realized I have not made cookies in forever. My husband's specialty is chocolate chip, so we eat those quite often. However, today I was craving snickerdoodles. I discovered this recipe back in 2008 when I went on a lake house trip with some friends. I met a sweet girl named Nicki who brought these delicious cookies with her. It was love at first bite. Even better, she told me that she made them with a box of yellow cake mix and only 5 other ingredients. I love it when easy meets delicious!


Ingredients:

1 box of yellow cake mix
1 tsp vanilla extract
1/3 cup vegetable oil
2 eggs
1/2 cup sugar
2 tsp of ground cinnamon

Directions:

1. Preheat oven to 375.

2. Mix cinnamon and sugar and set aside. (This does not mix into your cookie dough)

3. Using mixer, combine cake mix, vanilla, oil and eggs until a dough is formed.

4. Shape cookie dough into 1-inch balls and roll in cinnamon-sugar mixture. (Kind of sticky so sometimes I drop a spoonful into the mixture to get started.)


5. Place on cookie sheet and bake at 375 degrees for 8-10 minutes, or until golden brown.


6. Remove from pan to cool. Enjoy!!


I love snickerdoodles served with a small glass of cold milk. This recipe made 30 cookies today. I don't make my cookies huge, but I think they are just the perfect size. Besides, my children's favorite phrase is "One more please?!" This easily allows me to give them two cookies at a sitting without feeling total mom guilt. Ha!


Friday, July 27, 2012

AstroBrights Paper...The Color Never Stops

This is a Sponsored post written by me on behalf of Astrobrights Papers by Neenah Paper for SocialSpark. All opinions are 100% mine.
You may need your sunglasses for this...AstroBrights Paper! The colors of these papers are so vibrant and bold that they are naturally an irresistible choice for flyers, brochures, invitations, and more. I am planning a golf tournament for my husband's birthday celebration. This became an annual event about 7 years ago. He actually proposed at the first tournament I threw him so it will always be the most memorable. We missed a few years of tournaments in the middle, when he insisted his golf game was not doing well. Lol! We both play for fun, but I guess it is hard not to be competitive. Anyways, I am currently designing a flyer for the tournament in September, and AstroBrights paper would be perfect!


AstroBrights paper is about creativity and getting noticed. How could you not help but notice these vivacious colors. This paper would also be perfect for scrapbooking, school projects, crafts, chore charts, and more. I would love to make a pennant banner for my son's next birthday party with these bright colors available from Astrobrights. It would be such an eye-catching display. What would you use AstroBrights paper for?

I love that AstroBrights is concerned about the community and giving back. You may support your local elementary school by entering the "Give a Brighter Year" sweepstakes. Don't miss your opportunity to win a cash prize and school supplies valued at $30,000 for the school of your choice. I can't imagine a better surprise for your children's deserving teachers. My mom has been a teacher for over 30 years and I know she would love to hear that her school was getting even more new school supplies.

AstroBrights is also encouraging everyone to participate in their family-friendly and fun "Make Something AstroBright" design challenge. Unleash your creativity for a chance to win Astrobrights paper and other prizes. Are you all as addicted to Pinterest as me? Make your project and pin it to one of your craft boards. Make sure you include the hashtag #goastrobrights. I will see you on Pinterest. I can't wait to see what new projects you have designed and created with AstroBrights paper!!

Here are a few cute projects I have seen so far.


Paper ball by My3monsters.com


Flower bouquet by pinkpolkadotcreations.com


Paper Shapes Recipe Book by the36thavenue.com


Decorations by diyinspired.com


DIY mini clipboards by 733blog.com
Visit Sponsor's Site

Tuesday, July 24, 2012

Pirate Book Box...Summer of the Traveling Books

With 100 degree days still in effect here in Texas, I have been creating more book boxes to exchange between our friends. We had a huge pirate party a few months ago, and we did not use all the treasures I bought for it. I decided it was a perfect theme for another book box. Again, I already had all the supplies at my disposal. I ended up buying an extra pirate book at a garage sale and some pirate figures from the $1 store. Entire investment=$1.50.


This is the first box my boys have actually tried. All the rest were passed out to our little friends when they were completed. I figured all the book boxes would come back to us eventually, and worst case scenario, we could do them in the winter when it is too cold to go outside and play. I was happy they were a huge hit with my boys and the time involved to put them together was not a waste.

Pirate Book Box Contents:

·         How I Became a Pirate by David Shannon
·         Pirates Ahoy! By Hans Wilhelm
·         I Spy Pirate Treasure book

Do Pirates Take Baths? by Kathy Tucker
·         Jabber the Parrot reading buddy
·         Magnetic Pirate Adventure
·         Pirate hat craft to make


We made the pirate hat first so it could start to dry. Our reading buddy, Jabber the Parrot, watched as my son worked.


    Secret watercolor craft. Please find the white card with your child’s name on it. Paint with watercolor on the front side and wait for the secret picture and message to appear. (This was done by drawing on a white piece of paper with white crayon) When painted with watercolors, the secret message appears as shown above. This received several very excited ooohs and aaaaahs from my kiddos.


·         Pirate Dominoes printed from busybeekidsprintables.com
·         Treasure map Hershey Kiss treats for pirate day

·         Individual bags of pirate figures. Keep a bag for your child. Create a boat for the bath out of a plastic bottle or even tin foil and set them on a pirate adventure.


·         Have fun! Make sure everything on this list is returned to the book box for the next child.
·         Let me know when you have worn out your book box and we will trade. I am hoping to trade about every 3 weeks and just meet up with you. Thanks! Michelle

Friday, July 20, 2012

Easy Sew Envelope Pillow Covers

I am so excited to share with you these lovely and easy to sew pillows. My cousin's wife emailed me with a project idea for her new apartment and I was thrilled. She ordered this fabulous fabric online and wanted to cover her current pillows with a more modern and chic look. I immediately loved her fabric choices. My house is more rustic, so it was a great opportunity to make something with bright and vibrant fabrics for a change.


These pillow are so inviting!

Instructions:

1. Cut your fabric long enough to wrap around your pillow horizontally with about a 6 inch overlay. Measure the height of the pillow and add 2 inches more.
For example if your pillow was 16x16...you would cut a piece of fabric width (16x2+6=38 inches)...and the height (16+2=18).
Goodness, this is hard to explain. I hope the picture helps. I am generous with the 2 inches extra, because it allows me to not have a perfect 1/4" seam.


2. Fold over the fabric on the short ends and sew a seam to give it a finished look.


3. Lay the fabric print side up and lay your pillow on top.

4. Fold up one side of fabric followed by the second side of fabric. Then, carefully slip out the pillow.


5. Once you slip out the pillow, secure the fabric with pins. See picture above and notation of where to sew.


 Sew along your pin line. (This is Sara sewing her first pillows!)

6. Turn pillow cover inside out and stuff your pillow inside your new cover.

The best thing about pillow covers is you can change them as often as you like, and you can also remove them for washing. What a bonus if you have kids, animals, or the husband that insists on eating on the couch! These may have taken us 10-15 minutes per cover including cutting, pinning, sewing, and covering. It's time to spruce up your house for the summer!

Monday, July 16, 2012

Frozen Yogurt Salad Topping

I really struggled on what to name this post. I am not sure what to truly call my latest concoction. As many of you know, I hate to waste anything...which includes food that is about to expire. I had strawberry yogurt on the brink of expiration and some fresh strawberries that were getting a little wimpy. The answer to all my food problems...the freezer. Thence was born, my frozen yogurt salad topping. It was unexpectedly scrumptious!


Ingredients:
Yogurt (flavored)
Water
Fresh fruit sliced and cut (strawberries)
Candy mold

Directions:

1. Mix one container of yogurt with cut up fresh fruit and a few dashes of water.

2. Pour into your favorite mold.

3. Pop in freezer until frozen. I popped all of mine out of their heart shaped mold, and kept them in a Ziploc bag. I just grab them out and throw them on top of our fresh salads.


After scoring some home grown tomatoes from my sweet friend Angela at work, I made salads several nights this week. They are such a filling start to a meal to keep me from over eating the main dish. Good luck making your own frozen yogurt salad topping concoction!

Thursday, July 12, 2012

Cow Appreciation Day at Chick-fil- A

Our family loves Chick-fil-A! Friday, July 13th, is their official Cow Appreciation Day. The best part is children and adults can dress up and receive free meals or entrees. My boys grandparents are going to take the boys tomorrow, because I will be having LASIK! I am hoping it turns out well, because I would love to be able to see. I can't even read the BIG E on the eye chart without my contacts or glasses. Cross your fingers and toes please.


Here are the official rules from Chick-fil-A's website:

Q: What is Cow Appreciation Day?
A: For one day only, black and white spots, cow bells and furry ears will be appropriate attire in the nation's second largest chicken chain. In celebration of July 8, Cow Appreciation Day, an unofficial – yet nationally recognized holiday, Chick-fil-A will award a free combo meal (breakfast, lunch or dinner) to any customer who comes to one of the chain's 1,200-plus restaurants fully dressed as a cow.
Q: What does "fully dressed as a cow" really mean?
A: "Fully dressed like a cow" means effort to be dressed like a cow from head to toe. "Partial cow attire" means just a cow accessory, such as a cow-printed hat, vest or purse.


Here is my post from last year in regards to our outfits...

I decided to join in the fun. First, I made my youngest son a cow shirt by sewing cut up pieces of a black t-shirt on a white shirt. Simple.


Next, I decided to tackle a costume for my three year old who is currently very entertained by super heroes. I decided on a cow cape. Of course, being the fabric pack rat that I am, I happened to have some cow print fabric at home. Here is what I designed.


I started by tracing a super hero cape I had at the house. I cut out one piece in cow fabric and one in plain black fabric. I then cut out blue and yellow felt to decorate my son's super cow cape and stitched it in place on the cow fabric.


I sewed right sides together, leaving a little opening, and then turned it right side out. I did not take pictures of all the steps because there are so many great tutorials out there for super hero capes. The point is any cow creativity will score you free Chick-fil-A on July 8th! My son is very excited about the "cow party."


Other Ideas:
  • Cut out cow spots with black vinyl or paper and adhere them to a white t-shirt.
  • Cut holes out of a white t-shirt and wear a black t-shirt underneath
  • Use a sharpie marker to decorate a white shirt
  • Carry anything with cow print

Tuesday, July 10, 2012

Water Balloon Target Practice

Can't beat the heat..join it!! Nothing is suited better for a hot summer day then water...or even better...water balloons. As usual, I was dumpster diving a few weeks ago, and found some old water noodles on a curb. I grabbed the whole bag and took them home. I knew they deserved a second chance and I had just the plan. Of course, I hid them in the trunk of the car from my husband until the time was right. It is just not worth the sigh of exasperation some days and "What exactly do you plan to do with those?!?" He does say it all in good fun...but it is truly more fun to suprise the whole family with my crazy little plans for quality time.


To start with I filled a LOT of water balloons. The boys could hardly stand watching me get them ready, without getting their grubby little hands on them. (Next time, I might have to fill them up during nap time!) Ha!


I took my "noodles with a second chance at life" and taped them into circles. I used a sharpie to write on 1,2,3,4 for points. Line them up and get ready for target practice!


We brought out a chalkboard from inside my son's room and he named two teams. From the start, the score was never accurate. He gave himself points every time he had a chance. It was so much fun, that this was not the time to teach him true score keeping.


Let the fun begin!


Of course, my well planned game transitioned into many new forms. One being...jump on the water balloons and squirt your little brother. Hee hee.


We also ended up on the top fort of the swing set, bombing anyone who dared walk below. My boys are already requesting round 2 of the great water balloon target practice. I think my husband and I had as much fun as they did!!

What's For Dinner?!?

Do you ever realize in the middle of the day you have no idea what to cook for dinner? I do...almost every day. I have been trying to make my blog a little more user friendly. I realize we are in a Pinterest obsessed Internet era right now, where we love pictures. (myself included). Check out my new tab at the top of the page titled recipes. It is a picture summary of all the recipes on my blog. Just click on the recipe title below the picture, to be transported to ingredients and directions for your next dinner.


Please let me know what you think? I am debating reorganizing more of my blog this way. I would love your opinion.

Saturday, July 7, 2012

Cupcakes, Ice Cream, and Flip Flops Book Box

I decided I needed a book box with a more "girl" centered theme. We have two little girls that have signed up to participate now. The list of kiddos for the traveling book boxes is quickly growing. (Original post here) Miss Whitney will soon receive the cupcakes, ice cream, and flip flops book box.

Cupcakes, Ice Cream and Flip Flops Summer Book Box Contents

·         If You Give a Cat a Cupcake by Laura Numeroff
·         Ice Cream Everywhere by Marjorie Blain Parker
·         Flip Flop by Dana Meachen Rau
·         Henry and Mudge and the Best Day of All by Cynthia Rylant
·         Ice Cream Time
·         Game: Ice Cream Popsicle Matching. Play memory with the popsicles or just mix them up in a big pile, set the sand timer, and race to put the matches together before time runs out.
·         Game: Cupcake Recipe. Pick a cupcake recipe and create your felt cupcake with the right number of ingredients of sprinkles, chocolate chips, and cherries. Recipe cards available here to print.


·         Ice Cream Shooting Toy-Keep one for your child. Great prize for one of the games
·         Craft: Make your own flip flops. Example included. Let your child make some foam flip flops with pipe cleaners and decorate them with stickers.
·         Eat: Ice cream scoop and two small ice cream bowls included. Dish out a special ice cream treat and add star sprinkles on top.
·         Eat: Cupcake sandwich. Instructions here (http://greeneacreshobbyfarm.blogspot.com/2012/06/cupcake-sandwich-and-fathers-day-ideas.html)  on how to make this simple sandwich. Place a skittle on top.

 
·         Have fun! Make sure everything on this list is returned to the book box for the next child.
·         Let me know when you have worn out your book box and we will trade. I am hoping to trade about every 3 weeks and just meet up with you. Thanks! Michelle


Tuesday, July 3, 2012

White Castle Craver Nation!

This is a Sponsored post written by me on behalf of White Castle for SocialSpark. All opinions are 100% mine.
Have you ever heard of White Castle sliders? They look delicious. I always realize what an appreciation I have of good burgers every time I am out of the country. Beef elsewhere just never seems the same. We just arrived back from Mexico, and the first thing my husband and I wanted was a great burger. (Or just any food that would not make us sick. We ate at the resort the whole time and we all still ended up not feeling well one day or another. Ugh!) We stopped on the way home from the airport for a burger because we were both craving one! True story! Now I am wishing we had a White Castle around us because we would have surely tried it out.


I am sure you like a great deal as much as me. Well...you can receive 2 FREE SLIDERS at CraverNation.com when you sign up. I tried it and it is sooo easy. I cruised around the website and found numerous fun contests to enter. Try out the You Just Got Served and National Anthem Contests.There is also a Slider Glider contest. I think this one is absolutely hilarious. The prizes include a $100 gift card to the Sunglass Hut. The challenge is to literally cover your slide in condiments and film yourself as you glide down that bad boy! Ha! Can you imagine ketchup, mayonnaise, and mustard everywhere.


Watch one of the videos already posted to see your competition and get a good laugh! Here is how to join.
I love the atmosphere of the Craver Nation website. Go look around and have some fun.
White Castle Logo.png
How far would you drive to get a White Castle Slider? I looked them up, and it appears they don't have one it Texas yet. I guess I am just going to have to pick one of the twelve states they are in and take another vacation. Sounds like a good excuse to travel again to me. (Smile) Have you tried White Castle before? Tell me how much I am missing out!
Visit Sponsor's Site

Sunday, July 1, 2012

Firework Watching Pillow (No Sew)

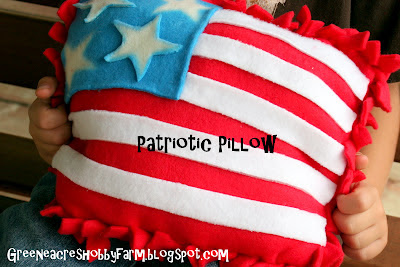
We are off to see some fireworks tonight for the 4th of July. Yipee! My "fabric fairy" (my mom's friend at school that gives me bags of her extra fabric) recently passed on a whole garbage bag full of fleece to me. I am so lucky! My oldest son and I came up with the idea to make flag pillows to rest our heads on for the fireworks show. The best part is they are no sew patriotic pillows.


Supplies:

Scissors
Red, white, and blue fleece
Craft glue
Stuffing


Directions:

1. I started by cutting a rectangle approximately 16" x 12"

2. Cut strips as shown in above picture. I usually cut them 1 1/2 to 2"


3. Next, I added my stars and stripes. One of the fabrics, was blue fleece with stars, but they were very spaced out on the fabric. I went ahead and added a few extra stars. My son helped glue the stars and stripes on with craft glue.


4. Begin all the ties. I like to have each one double knotted.

5. Stuff with filling.


My son was getting a big kick out of the fleece fabric. Such a dork! He looks like an old fashioned airplane pilot to me with his scarf, hat, and goggles. Ha! He literally played with the fleece the whole time I made his little brother's flag pillow for him.


6. Finish tying all the edges, and hug and squish your new flag pillow project.
(He was soooo proud of it. It sure is the little things in life that make us truly happy)


Added after the fireworks...


What a view...amazing!!


Related Posts Plugin for WordPress, Blogger...