Showing posts with label Holiday Gift. Show all posts

Tuesday, December 17, 2013

Homemade Lavendar Sugar Scrub

Yes. Still waiting on our house to be done. Still waiting on a place to live and my craft room! In the meantime, I went over to my "cousins" house to create some homemade lavender sugar scrub. She has become a Pinterest addict and I love that about her. This was literally the easiest and fastest gift I have ever made. I was going to say it was dummy proof...but I accidently forgot to add lavender to one batch, and had to go back and mix it in, because we were chatting.  Oops!


Supplies:
 
Sugar
Olive oil
Essential oil (Lavender)
Containers
Tags
Ribbon
 
Directions:
 
1. Mix 2 cups sugar with 1 cup of olive oil. (Basically 2:1 ratio of sugar to oil)
 
 
2. Add in 5-7 drops of essential oil. (I used lavender). Pour into containers (small mason jars).
 
3. Seriously that is it! You are done!


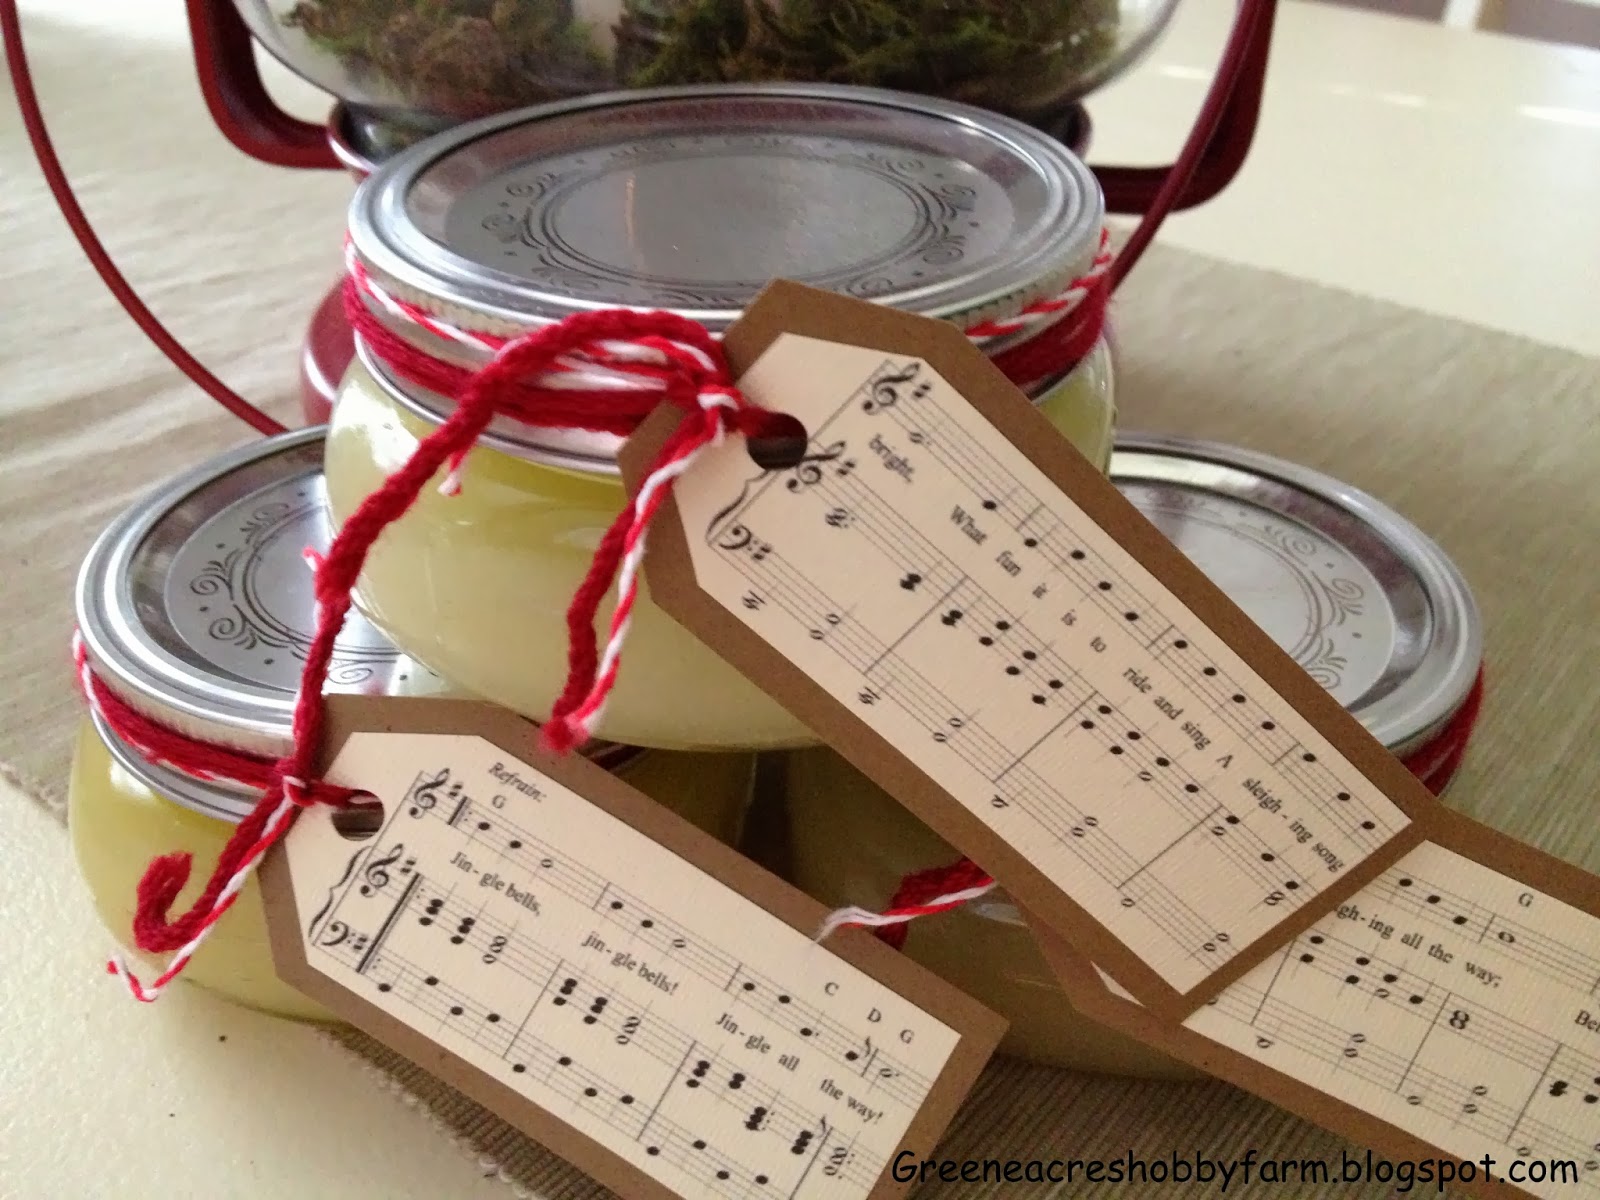
It took us minutes to make the scrub, and then a lot longer to create fun tags. We printed off some Christmas carols and attached them to the tags. These sugar scrubs cost less then $2 a container including all of the supplies.
 

Friday, May 31, 2013

DIY Wooden Child Picnic Table Instructions

My husband made this adorable child size picnic table last summer for our boys...and as usual...I never got around to posting it in the right season. With Summer here, we are enjoying quite a few picnics outside again. I truly think my boys eat better when we are outside. There is just no fuss about sitting down for lunch in the backyard.
 
We are still packing like crazy around our house so I am exhausted. My crafting skills have been confined to making cardboard boxes lately!


The only major problem with posting a project like this a year later...is that I didn't write down all the directions. Hopefully, I took enough pictures that the explanation will be somewhat self explanatory.

 
I am thinking we started with eight 2x4's.

 
We started by cutting:
*Five 42" 2"x4" for picnic table top
*Two 16" pieces of 2"x4" to mount under picnic table top
*Four 42" 2"x4" with angled edges for picnic table seats
* Four 26" 2"x4" for picnic table legs
* Two 42" boards to support seats

 
The supports for the picnic table top were placed 5 1/2" from the ends of the table.


This is how my husband assembled it pictured above. Their might be an easier way...but we are by no means carpenters! We did pull out the level though.

 
We loved ours so much that we ended up making some more child size picnic tables as presents. Depending on the price of wood in your area, this project should cost you $25-$35.


Last...but not least...we stained the table. This project only took a few hours to make, and it was well worth the effort. The boys love it and it is the perfect size!
 

Saturday, March 9, 2013

St. Patrick's Day Scratch Off Ticket Free Printable

I made these fun St. Patrick's Day Scratch Off Tickets (free printable) for my little one's. Every year, a little leprechaun named McMischief, comes to visit our house the week before St. Patrick's Day. McMischief usually leaves a trail of gold coins to something fun each morning. One morning it might be a box of Lucky Charms cereal, another day green milk, and usually some sort of St. Patrick's Day surprise.


This year I thought it would be fun to leave scratch off tickets from the mysterious and elusive Leprechaun named McMischief. They say...Are you feeling lucky? Scratch off three clovers in a row to win!

To download this free St. Patrick's Day printable from docstoc.com visit the link here. You will have to create a user name and password to download the many free printables I have shared. Please let me know if you have any problems!


St. Patrick's Day Scratch Off -
 
Supplies:
Free printable 
Clear Masking Tape
Acrylic Paint
Dishwashing soap
Paint Brush
 
Directions:
 
1. Print out the Scratch Off Cards. There are three to a page. 2 are winners and one is not. Cover the shamrocks with a piece of clear masking tape.


2. Mix up any color of acrylic paint with a drop of dishwashing soap.
 
 
3. Paint over the masking tape area to cover the scratch off. It is a little (or very)  bubbly at first as shown below. No worries. By the second coat, it covers it perfectly. ( I used almost paint only as the second coat. Look at the last picture)

 
4. Cut apart your St. Patrick's Day tickets and get to scratching! So Fun!
 
 
You can also get this free printabe I made last year here.


Monday, December 10, 2012

Repurpose Placemat to Clutch Purse

How are your holidays going? All of our decorations are up and I am over 75% done wrapping gifts. This is officially the most ahead I have ever been. Normally I am still wrapping the night before Christmas. I just thought I would share this quick tip. I was headed to a gift exchange, and I was desperate for some gift wrap. We don't live close to many stores so I dug through my supplies. I found this placemat that no longer had its mates. I folded it up in the shape of a clutch purse. I sewed the two sides leaving the flap open. I quickly attached a little snap...and Voila... a cute little bag or clutch purse for wrapping. I wrapped my present inside and off we went.


The funniest part, was everyone loved it so much, they asked where I bought it. Cracking up I told them my desperate gift wrapping story. Who knew it would be such a hit!
 

Sunday, December 2, 2012

Fairy Land Little Girl Gift

Welcome to the magical and mystical fairy land! I made this little village a month ago for a birthday party gift for a sweet little girl. Apparently, fairies are the rage right now. I wouldn't know...I have two little boys. However, it ended up that my boys had just as much fun playing with it! This would be an awesome little DIY present for a little girl for Christmas.
 
 
I have to admit I had a LOT of fun making this little fairy village. I would have loved this as a little girl. I really enjoy toys that encourage a child's natural curiosity and imagination. This project is amazing for creative play.
 
Supplies:
 
Bird houses
Paint
Moss
Dirt
Artificial flowers and leaves
Twigs and branches
String or Yarn
Hot Glue
 
Directions:
 
I started transforming my bird houses to fairy houses first. I bought two of them at Michael's, and stumbled upon the other one at a garage sale. My husband helped enlarge the naturally small bird entry to fit a fairy instead.


Next, I began painting the fairy houses.


I hot glued leaves on to one of the homes to make it a bit more woodsy in appearance.

 
I set it up on a table to get my design layout. Small stumps cut from a dead tree branch served as a path. A stripped off portion of a tree became a bridge. Small logs were fashioned into outdoor benches.

 
In order to create the fairy land back drop, I drilled a small hole in some small pieces of wood. I was able to glue my fake trees (leaves) into them to stand upright.

 
I glued moss on the garage sale bird house find to help camouflage it into the fairy woods.

 
My 2 year old could hardly stand it as the fairy village was being transformed. He began to play with the miniature fairies as he walked them along the path to their homes.

 
The longer I built, the more ideas came to mind. I was able to carefully drill two holes in a small branch, tie yarn through the holes, and set up a swing for the lovely ladies.

 
Come and swing a spell!

 
Ta Da!  Welcome! Here is my new home. It even has a flower pot with flowers outside the front door.

 
My husband helped make a box with some landscape timbers and plywood. I used real dirt in the bottom with fake moss on top. It truly was magical as the burlap pennant sign reads. 


Oops. I almost forgot to mention the ladder. Another stick and yarn creation!

 
Here is fairy land as a bird's eye view. It looks so welcoming that even I would love to go stay for the weekend. Lol! Another sweet friend saw this creation in the works and has already nicely requested one for her daughter's birthday next week. I better get to work and fast!
 

Sunday, January 15, 2012

Leftover Christmas Wrap into Adorable Paper Bags

Does anyone else have extra Christmas wrapping paper laying around? I had a stack of leftover Christmas paper that I don't care to store until next year. When I was a little girl, my mom, sister, and I used to make all kinds of cute bags from our wrapping paper. I had some precious penguin paper left and we are having a winter penguin party this Friday. A perfect match.


Supplies:
Wrapping Paper
Box from the cupboard
Glue Stick

Instructions:
1. Start by picking a box from your cupboard of desired size. Cut your wrapping paper as if you were wrapping a present minus the top side.


2. Begin wrapping your box, leaving the top open. I used a glue stick instead of tape to seal the edges.


3. Fold the bottom and glue. (My little helper assists)


4. Carefully begin removing your box from the wrapping.


5. Crease the edges and sides well to form your bag.


6. I used fancy scissors to trim the top and voila...


These precious little bags are going to be our lunch sacks for the penguin party later this week. Just remember any wrapping paper will work. It is also a great solution when you can't find the bags you want. Just buy a roll of wrapping paper in your desired color or print and set to work. These little gift bags are easy to make yourself.

Tags: DIY gift bags, Make your own gift sacks, Treat sacks

Tuesday, January 10, 2012

Fleece Blanket Transformed to Scarves

If you are still out hitting those after Christmas sales, here is something to look for...fleece blankets. I bought one last year on sale for $3.99 and was able to transform it into eight scarves. Do the math...that is only 50 cents a scarf! I gave them to my co-workers accompanied by another small gift.


Here is the striped blanket I started with. I also bought a really cute red plaid fleece blanket last year, pictured in the photo above. It still looks good after a year of wear.


I used a cutting mat and a rotary cutter from my quilting supplies. Of course, old fashioned scissors would work perfectly too. I cut them into about 6" strips.


I then cut the ends about 5" up in small strips. I left the fray of the blanket stitch on the bottom for character.


Now go out and find some cheap and adorable fleece blankets to transform. I would love to see your pictures when you are done.

Tags: Repurpose fleece blanket, DIY fleece scarf, Make your own scarves

Wednesday, December 21, 2011

Santa Soap for 99 cents

I am so behind on posting! We have been so wrapped up in the holidays, that I just have not spent any time on the computer until the last couple of days. The good news is we have been having a lot of great family time. The holidays are so hectic and overwhelming at times. I am sure you understand. However, this fast and easy Santa Soap cost me only 99 cents to make (I did already have some leftover supplies at home).


This is the 99 cent soap I bought at the store to transform into Santa. Start by removing the labeling and washing off the "goo" left behind.

Next, you are ready to paint. You will need  primer, red paint, black electrical tape, and gold tape or vinyl.
This is not the first time I have painted soap bottles. Look here for full directions on priming and painting the soap container. Once my paint was dry, I wrapped the bottle in black electrical tape and cut out a buckle from some gold tape. No talent needed for this project!

Guess who is ice fishing? I think it is hysterical.


I froze some gummy fish in the ice the night before so Jingle could do some ice fishing. The ice will melt by the end of the day and your kiddo can eat the gummy fish left behind. Oh that crazy Jingle...what will he do next????

Sunday, December 4, 2011

Snowman Pocket Hand Warmers

My sweet cousin called me the other day, looking for a class project, for her daughter's holiday party at school. She wanted something unique for the kids to make, that they could take home, and enjoy over the break. I already had an idea dreamed up...I  just needed to see if it actually worked. My little one is always complaining about how cold he is in the morning on the way to the car. We live in Texas...so trust me...it is not that bad compared to a million other places we could live. Here is my latest hand warming creation.


Supplies:

Fleece fabric
Rice
Craft Glue

Directions:

1. I started by cutting out white circles in about 3 1/2" diameter. It takes two circles per snowman.

2. Next, I sewed around the snowman, leaving a small opening. On the girl, I sewed on the red cap in the process.


3. Using a funnel, I filled the bags with rice and sewed the small opening closed. I don't fill them too full so they are still squishy.


4. Decorate a face with small pieces of cut fleece. I used glue to attach the face. (If this were not for an entire class of 24 kids to make, I would probably sew on the face so it would last longer)

5. Pop your little rice snowmen in the microwave for about 20 seconds. Let your little ones hold them and place them in their jackets pockets to warm up their frosty fingers.

Warning: As with anything in the microwave, excessive heating can cause fires. Please also be aware if heated too long, these little snowmen could be a burn hazard. Please be careful.

Wednesday, August 24, 2011

Personalized Teacher Gift

I was inspired to make these personalized teacher gifts from a post I read on Brown Paper Packages last year. Kierste from Brown Paper Packages is so clever. My sons start their preschool in a week and I wanted to let the teachers know how much we already appreciate them. I bought a handful of antibacterial soap from Bath and Body Works last time they had a sale. I thought these would make a perfect first day of school present.


Supplies:

Antibacterial soap
Spray can of primer
Tape
Spray can of color of choice
Vinyl or stickers
Ribbon
Directions:
1. Peel off the label on the front of the soap bottle and scrub off any residue. Ensure dry before proceeding.
2. Tape off section on the front that you want to paint and decorate.


3. Spray paint soap front with primer. (Make sure the pump is covered too)
4. Allow primer to dry. Here in 100 degree Texas weather it is soooo fast. I forgot to take a picture of the next step...but spray your color of choice over the dry primer. 


5. Allow paint to dry completely. Carefully remove tape from soap dispenser.
6. Decorate with teacher's name, stickers, hot glued flowers, ribbon, etc.


We were having such fun making them we decided to make one for the boy's dad as well. I showed them to my husband and he could hardly tell it was paint on top. I hope the teachers like them!


Parties I linked to:

NightOwlCraftingSomewhat SimplePhotobucketFantabulous Friday!http://linesacrossmyface.blogspot.com/search/label/the%20Cure%20for%20the%20Common%20Monday

Related Posts Plugin for WordPress, Blogger...