Showing posts with label Gift. Show all posts

Monday, May 12, 2014

Unique Teacher Appreciation Lunch

My son has the best kindergarten teacher I could have ever asked for. Last week for teacher appreciation week, the school had a really fun theme of "Super Hero" teachers. They used the word Super, and challenged the students to bring an item any day they wanted that fit the theme.

S=supplies for school
U=unique gift
P="pretty" smells (flowers, lotion, etc)
E=something to eat
R=something to read
 
 
We participated in several days and we had a lot of fun coming up with creative ideas. For our teacher appreciation unique lunch idea, we sent a salad in a large mason jar. I wrapped a small piece of burlap around the jar and I hot glued it in place. Next, I created a tag with the theme of Peter Rabbit and called it a "Veggie garden" We sent a side of salad dressing and my son headed off to school with a fun salad for teacher appreciation week.

 
FYI: For the order of the layers...tomatoes, carrots, cucumbers, cheese and lettuce
We kept it simple but you could easily add green and red peppers as well.

Sunday, July 21, 2013

Mommy and Me Date Gift Set

While trying to decide on a gift for my best friend, and my son's best friend, whose birthdays are a few days apart, I elected for a joint gift. I made a basket full of Mommy and Me date nights that I hoped they would both enjoy. The gift basket included 5 date nights for Mom and son.


Mommy and Me Date Nights!

 
I kind of wished I had made a duplicate gift for my boys and I with date nights when I was done. We could really use some good excuses to get out of our camper we are living in right now! Funny story. After 5 days of rain in Texas, I drove up beside the camper to park on the land as usual. I quickly realized my tires were not moving smoothly any more. I attempted to begin backing up without success. I was stuck in the mud!! Finally, after quite some effort, and a little panic, I managed to avoid hitting the camper and our current water line. It was a close one according to these tire tracks.


I was so afraid to go back, I drove off to stay somewhere else for the night. My boys were so confused as I drove off. "MOM!" After my luck lately, I was not going to chance finding a safe spot to park, where I could actually leave early in the morning for work again. I accepted my defeat calmly. Plan B. Ok, now on to the date nights.

 
Date Night 1: Bake some brownies with me!
 
(Brownie mix and a new spatula)

 
Date Night 2: Take me to the movies
(Movie tickets and some candy treats to bring along)

 
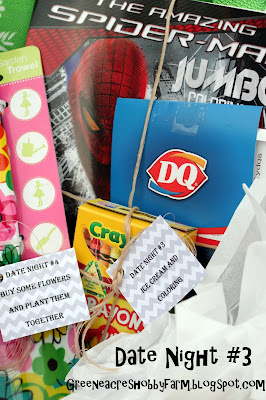
Date Night 3: Ice cream and coloring
(Gift card to buy ice cream at Dairy Queen, coloring book, and new crayons)

 
Date Night 4: Buy some flowers and plant them together
(Garden gloves, small hand shovel, and money to buy flowers)

 
Date Night 5: Fly a kite, blow some bubbles, and use glow sticks in the swimming pool after dark!
(Beach bag, kite, bubbles and glow sticks)

 
I hope they enjoyed the gift!!
 
P.S. I didn't have a fancy way to make the tags. I googled images for chevron print. I cut and pasted the image in Microsoft Word and then typed the text over the chevron image. It was super easy and it did not require a fancy program.


Friday, July 5, 2013

DIY Egg Carton Fire Starters for Camping, Fireplace, and More

We are officially moved into the camper and out of our old house. This is our second week of camping bliss. Yes...I am lying. It has been...edited version...an adventure! We borrowed the camper from a sweet cousin, but it had not been used in a while, and it had a few problems. First there was a hose leak, and we didn't have water inside for about 4 days. Then we found a gas leak, and we did not have hot water for another 3 days. 7 1/2 months pregnant (A 5 year old, 3 year old, and a husband) without water or without hot water is NOT paradise. At least they have started building our new house. I am pretty sure this will lead to some funny stories years from now but I might be lacking a little humor at this point! (I'm laughing thinking about it though)

In the meantime, I made some really cool fire starters.


I have to say I learn so much from my patients. One of the best parts of my job as a nurse is talking to people. I meet the most interesting patients that I have to credit for teaching me a wide variety of things. One day, I had a patient that was a retired firefighter. I am not sure how we got on the topic, but we began discussing fires and ways to make fire starters. He explained to me this simple process for making homemade fire starters out of candle wax, sawdust, and cardboard egg cartons.
 
My husband was very skeptical the first time I used one of these little homemade fire starters. I placed one under the logs of our fire pit, and lit it on fire. Within minutes, even with quite a strong wind, our fire was ablaze. I made a quick believer out of him! I have to admit...I was quite amazed myself at the power of one little egg carton fire starter.
 
Supplies:
Old candles
Old pot
Tin can
Clamp
Sawdust
Egg cartons (cardboard)
 
 
Step 1: Fill egg cartons with sawdust 


Step 2: Melt old candle wax. I rigged a pot of boiling water with a clamp and a tin can to melt the wax in.
 
Step 3: Pour the candle wax in each egg carton compartment.
 
 
Step 4: When the wax is cool, tear apart each section, to create an individual fire starter.
 
Trust me...these things are amazing. It takes only 1 to start your average fire!


Tuesday, June 11, 2013

Dad's Secret Stache Father's Day Gift DIY

Are you looking for a unique, original, DIY gift for Father's Day? Have you ever seen those secret cans you can buy to store your money or valuables in. They are disguised as a can or a soda pop bottle, but they are made to hide your treasures. I have been wanting to attempt a DIY version of these secret compartment cans and I finally tried it! I made one for my dad for Father's Day and called it a "Secret Stache."
 
This entire gift took me about 10-15 minutes to make, including designing the tag to go on it. I just wanted something special for my dad to enjoy, and know I was thinking about him. He is also the type to tuck money and treasures in all sorts of places, so I can't imagine he won't be entertained by this gift.
 
 
I am going over to my parents tomorrow night to cook lasagna and give him his gift.
 
Supplies:
French Fried Onion Can with Pop Top
Foam or bubble wrap
Dad's Secret Stache Tag and Ribbon


Directions:
 
1. Carefully open your can of French Fried Onions to keep top intact.
 
2. Insert foam circle in the bottom of the can and then a piece to cover the inside wall of the can.

 
3. Hide your "stache". The foam helps so that you can't hear jewelry or anything metal bang around inside.
 
 
4. Carefully, set your pop top back on the can and close the lid.

 
5. Hope your dad enjoys his "Secret Stache!"


Looking for some of my Father's Day Gift Ideas from the past...
 
 
Customized Cutting Board for the Dad that Loves to Cook
 
 
Hooked on Daddy for the Fisherman for Father's Day
 
 
Father's Day Card for the Golfer
 
 
Father's Day card for the Business Man


Wednesday, May 8, 2013

Nurses Week or Teacher Appreciation Gift

This week is not only Teacher Appreciation Week...it is also Nurses Appreciation week. This gift, with a little modification, would work for either. For a teacher...You could easily put your a life saver! This simple DIY project is so fast to make. The vintage look really appeals to me, so I found an antique looking nurse graphic for these jars.
 
 
I filled the jars with a brightly colored loofah and some homemade goat milk soap. Tied with a little rafia and a sweet tag, the present was complete. The gift itself is so simple...but I think it is all about the presentation!  And besides, who doesn't love to be appreciated.
 

Tuesday, April 9, 2013

DIY Secret Agent Spy Kit Game

Oh did I have fun making this present! We had a birthday party for my son's cousins, and I couldn't seem to find a present I thought he would really enjoy. I searched the internet for a DIY spy kit to no success. I really wanted to make a spy kit that functioned more like a mystery game or a solve the crime kit. Of course, I came up with the idea a day before the party, so I really had to get to work fast on this birthday present!

 
I took a box and modge podged some spy symbols such as fingerprints, a spy, and some words like Top Secret.

 
I picked up some essential items for my spy kit at the store: spy disguise, handcuffs, gun, agent badge, and some rope.

 
Here is the full spy kit list.
CSI Field Kit
1.      Spy notebook for recording clues
2.      Ink pad for taking fingerprints for evidence
3.      Fingerprint file cards for keeping track of suspects
4.      Spy disguise
5.      Secret message maker wheel
6.      Fingerprint lifting tape (scotch tape)
7.      Fingerprint dusting powder
8.      Flashlight
9.      Specimen swabs (Q tips)
10.  Evidence bags (ziploc bags)
11.  Evidence: Plastic gun, knife, money
12.  Suspect cards
13.  Magnifying Glass
14.  Specimen Containers (old spice containers)
15.  Disappearing Ink
16.  Fingerprint glass (picture frame or glass) and brush

 
Several of my spy kit items were on sale at Michael's craft store. I completely lucked out.
 
 
I made some Solve the Case cards and had them laminated. The object of the game is to determine the criminal, weapon, location, and crime.

 
By laminating the cards, the players can use a dry erase marker to write on them. The cards can be easily erased with a cloth or paper towel.

 
I wanted this spy kit to be personalized for the birthday boy, so I made the suspects family members and good friends.

 
Thank goodness for facebook so I could capture images of all the suspects I needed. I googled some funny names such as Robin Banks (bank robber), Sam Dayoulpay, Sue Case, Nadia Seymour, and more.

 
I wrote funny things about each family member because I hoped the birthday boy would get a kick out of reading each suspect's profile.


Secret Spy Guidelines
1. All spy gadgets need to be in working order.
2. A good spy always keeps his or her wits about them.
3. A good spy has only one fear and that is other spies.
4. Keep your face neutral, you do not want to express your emotion.
5. Make sure you don't get yourself into any trouble!
6. Don't spy on people you don't know. Stay safe!
7. Be careful! Always keep your name a secret. Don't trust suspicious members of your team, for they could be double agents.
8. Never wander away from your team and don't trust strangers.
9. Find a secret meeting place.
10. Don't make too much noise! You don't want to get caught.
11. Bring a spy bag with you, to keep all your gadgets in. Maybe even some snacks in case you get hungry.

 
How to Play Secret Agent
 
Setup: Fingerprint each player on the Fingerprint File Cards.
 
1.      Select one or two detectives for each game. The detectives should leave the room.
The rest of the players will be in charge of creating the crime scene.
2.      Crime scene team should decide which suspect is the actual criminal. If present, they can place the criminal’s fingerprints on the fingerprint glass.
3.      Select crime scene location and label it with caution tape or clues.
4.      Select a weapon of choice between the rope, plastic gun, plastic knife, and fake money and leave it at the crime scene.
5.      Leave some evidence for the evidence bags and specimen containers. Example, if the criminal loves ketchup leave some out at the crime scene to be swabbed.
 
 
6. Choose 3-4 suspect cards to leave out for the detectives to help narrow down their search.

7. Once your crime scene is set up, allow the detectives to enter the room and investigate the clues with their secret agent supplies. They may even decide to question any witnesses and record their findings in their spy notebook.

8. The detectives may dust for fingerprints, collect specimens, collect items in the evidence bags and possibly wear their disguises while on the case.

9. Once the detectives have assessed the evidence, they will complete a Solve the Case card with a dry erase marker to see if they are correct.

10. Good luck Secret Agent!!
Now my oldest son is insisting he needs his own spy kit too!


Wednesday, February 13, 2013

Valentine for a Toe-tally Awesome Teacher

So I decided late this afternoon to make my son's teachers some special Valentine gifts. I should have thought of it earlier, but things have been crazy. We are in the process of purchasing some new land, putting our house up for sale, designing a new house, and I am still chasing my two young boys.
 
Well, to be honest, I also started feeling guilty that I had not done anything already, so I went shopping after work. I decided on some little pedicure kits for their teachers.
 
 
Contents:
 
Nail polish
Polish remover
Mini emory board
Cotton balls
 
I filled these little glass jars and put their teacher's names on top. I inserted a little note for a Toe-tally Awesome Teacher. Happy Valentine's Day!!

 
These mini pedicure kits would make great personalized teacher appreciation gifts too. (Just something to keep in mind) I hope you have a wonderful Valentine's Day!
 

Sunday, January 13, 2013

Felt Donut "Recipe"

What is better on a Sunday morning then some delicious donuts? Yum. My boys love playing kitchen just as much as most little girls I expect. They love cooking me up a quick breakfast or a nice hearty stew. We didn't have many options in our plastic breakfast food so I made them some felt donuts for Christmas. I was suprised that making felt food can be a bit time consuming. However, they have already spent hours playing with it, so it was worth every second.

 
I chose to make small donuts, about 3 1/2" each. I have seen many donuts on etsy that are the size you would generally buy at a donut shop. With storage always as an issue at our house, I decided small donuts would be the best.
 
Supplies:
Brown and tan felt
White felt
Scissors
Embroidery thread
Polyfill stuffing
 
Directions:
 
1. I started out by cutting out two tan circles about 3 1/2" each. I cut a small hole in the middle of both.
 
2. Next, I created my icing out of some white felt. I used small embroidery stitches of different colors to make the "sprinkles."


I chose blue, yellow and pink sprinkles for my yummy donuts.

 
3. Facing right sides together, I sewed around the outer edge only of the circles. (Don't sew the middle circle. I made this mistake the first time not thinking!)

 
4. Turn your donut inside out and add some stuffing. ( Just keep shoving it into the donut until you don't have any more stuffing showing in the center hole.)

 
5. The last step is to hand stitch the inner circle to sew the donut up.
 
 
I found this cute display box at Michael's for all of the cookies and tea bags. If you missed the felt Halloween sugar cookies look for instructions here. The teabags will be coming soon. I have a lot of posts to catch up!


Related Posts Plugin for WordPress, Blogger...